Polymer clay cane tutorials put to the test
Posted on February 28, 2010
I have found and used lots of free polymer clay cane tutorials on the internet, thank you to all those clever people out there who share their knowledge.
For a while I have come across tutorials that you have to buy and I have always wondered if it would be worth it. Well one day I decided I would splash out and give them a go. I have been delighted with the canes I have made and I hope I can now take what I have learned from these talented artists into some amazing creations of my own.
The main difference between these tutorials and the ones people share freely is the level of detail. They are complex canes and there are many pages of photographs to make sure you can follow them easily.
I have bought 3 now and love them all.
They are all in PDF format and arrive by email. Here are some of the canes I have made.
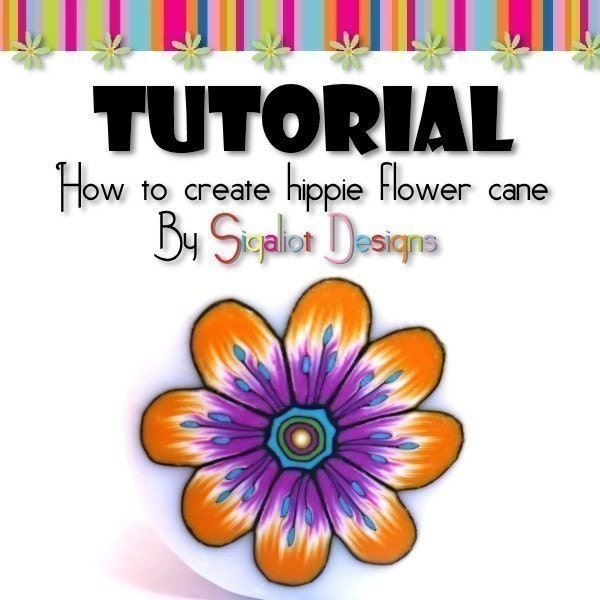
Hippy Flower Cane Tutorial from Sigaliot Designs
The tutorial was from Sigaliot’s Designs Etsy and cost $12. It arrived in my mail box very quickly and I couldn’t wait to try it out. It was well worth the money and I hope she makes some more tutorials soon! This is my personal favourite tutorial.


I made this cane in Kato clay. The detail is beautiful. I kept the centre more simple than Sagit suggested as I only had limited clay colours available and no time to mix. She has really taken time over the tutorial and set it out beautifully. It was very clear with plenty of photographs. It was easy to follow and produced good results. Sagit details the colours she used on the cane (she uses Fimo) in the tutorial and gives a recipe for a custom orange she used. She also shows the cane made in a different colour scheme and details the colours she used for that too. Sagit thoughtfully details all the steps in her tutorial including the skinner blend and includes a template with measurements for a 3 colour blend. I am sure if you used her colours you could make a cane identical to the one in the pictures. She also shows some pillow beads made with this cane which was nice to see. No special tools are needed (assuming you have a pasta machine – it is possible without of course but…)
I love her work Sagit uses such bright and cheerful colours and seems to be a real perfectionist. I don’t normally even think of buying other peoples polymer clay things – normally I think oh I’ll have a go at making something similar – but I am quite tempted to buy some of her beads, they look amazing and so well finished. I am not sure I will ever have the patience for all that hand sanding etc. Check out her
blogI’ve said it before but I just want to emphasise what a beautiful tutorial this is to look at. It doesn’t effect the result but it is such a pleasure to read it becuase it looks so nice.
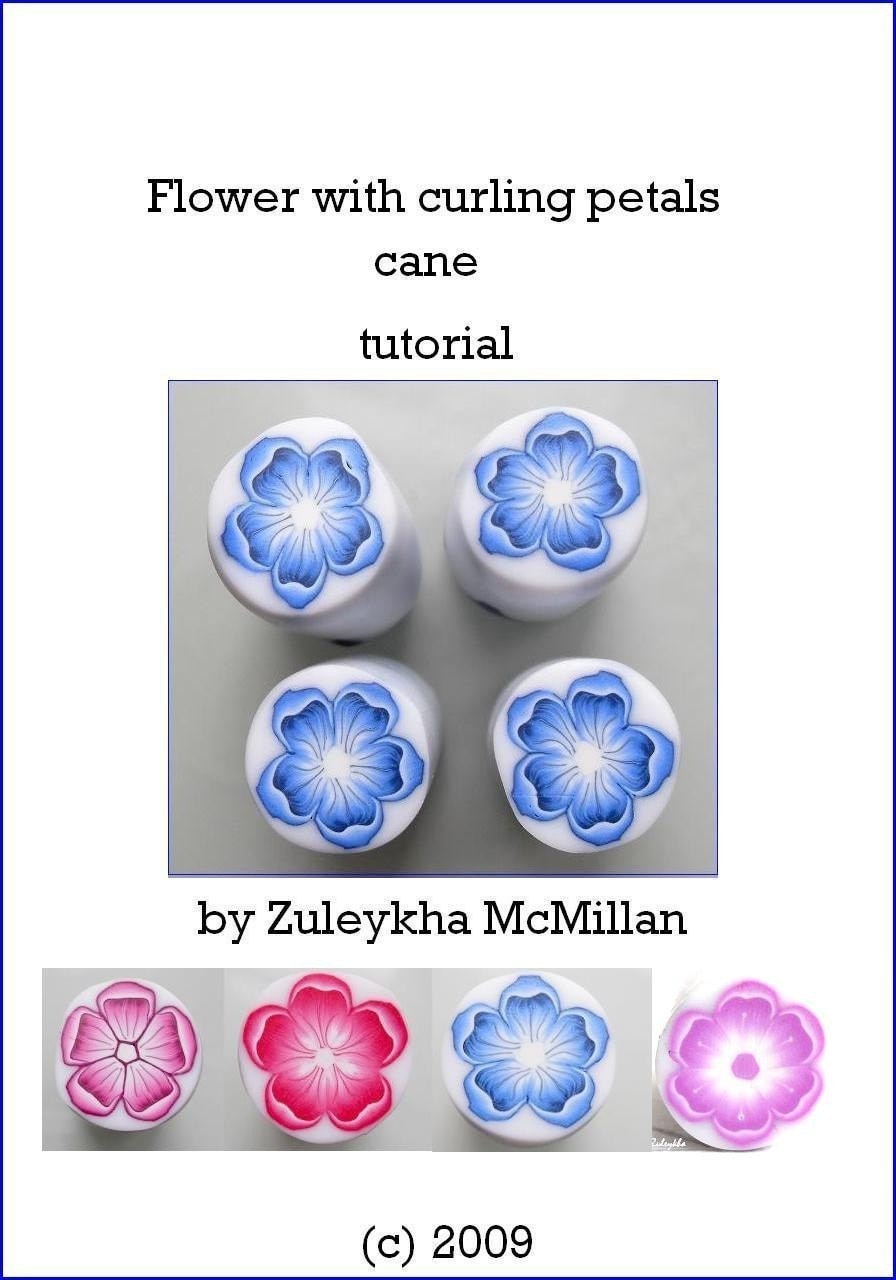
Flower with curling petals cane tutorial from Zuleykha
The tutorial was from
Zuleykha’s Etsy and cost $10. It arrived in my mail box very quickly and I couldn’t wait to try this one out either (I am not the most patient of people). It was well worth the money as it’s quite a different effect for a flower cane and I look forward to seeing some more tutorials from her, in fact I hope she writes a tutorial for her flower bracelets. This is a great tutorial!

The tutorial is well set out and has plenty of photographs. It is easy to follow and produced good results as you can see. I made this cane in fimo soft clay. She doesn’t give details of the colours she used for the cane illustrated but does show the cane produced in 4 different colour schemes which was good for some inspiration. She didn’t give a template for her 3 colour blend but there was a clear photograph and my blend worked out well. Zuleykha assumes you know how to do a skinner blend which is probably a fair assumption. She doesn’t use any special tools (again assuming you have a pasta machine).
You can see some more of Zuleykha’s work at her blog
here. Her work is beautiful and I hope to be able to make things like that one day too! Zuleykha has lots of lovely things for sale in her
Etsy store. I do particularly love her flower bracelets like this one.

Update – Zuleykha has a tutorial for beads like this on her blog here. Not having done much beading I think I would need some helping putting them together into a bracelet as beautifully as she does.
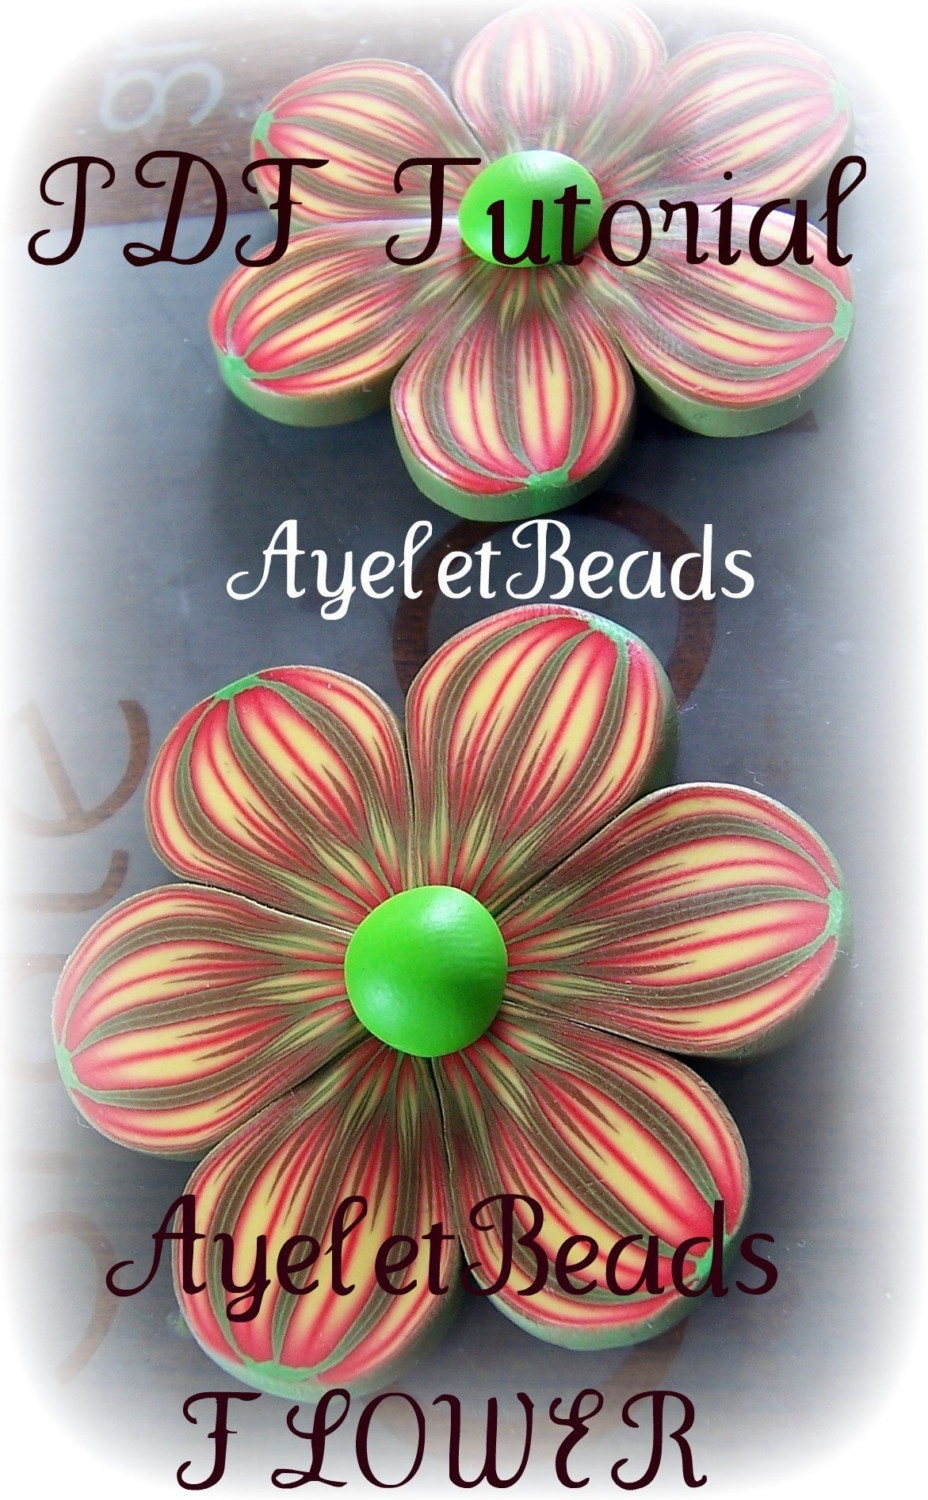
Ayelet beads tutorial
The tutorial was from Ayelet beads Etsy and cost $7. There was a slight technical hitch at my end (mail box full – they are large files) recieving the email but Ayelet was very friendly and helpful. It was the cheapest tutorial and it was $7 well spent. When I first came across these Ayelet flowers on Flickr I thought they were amazing and wondered how on Earth she made them. I was delighted to find her tutorial and now I can make my own! It is an amazingly detailed bead and works well as a pendant on it’s own so I am wearing this one already. The others are waiting to be turned into a necklace (I am not so keen on the putting it all together bit I realise). I love this tutorial and have had some great comments about this necklace.

This tutorial has plenty of clear photographs. It is detailled and enables you to produce your own amazing ayelet flower beads easily. This was my first attempt and I can’t wait to try some different colours. Ayelet doesn’t detail the colours she uses and only shows one colour scheme in her tutorial although you can see plenty of her flower beads on her
Flickr . She shows a necklace made with her finished beads in her tutorial which is good inspiration. You don’t need any specialist tools for this either with the exception of the pasta machine as always.
Ayelet also extremely kindly shares some free tutorials on Flickr that you can find
here. She is a talented lady!
I am glad I bought these tutorials they have helped me to make some beautiful canes and I have picked up some tips that have help me to develop as an artist. The price of the tutorials perhaps reflects how long it took these talented ladies to make them. The more expensive ones being set out and decorated better but they all have clear instructions that are easy to follow.


Thank you so much for taking the time to review my tutorial.
I’m so happy to read you love it and that it’s your favorite one 🙂
I really hope I will find the time to create more…with this kind of feedback, how can I resist? 😛
I’ll keep telling you how great it is until you do then 😉 Cara
Hi Cara! Thanks for showing your flower cane! I have a tutorial on my flower bracelets in my blog, it is free 🙂
http://zuclay.blogspot.com/2009/10/black-and-white-bracelet-and-flower.html
Hi Zuleykha. I had seen that (I have read every inch of your lovely blog. I have tried that technique but the home made playdough I used reacted with the fimo soft and I was just left with an ultra soft mush 🙁 I must try again with some shop bought dough. But then I think I would need help to make a bracelet like yours too. I have tended to make pendants rather than do any construction. About time I learnt I guess.
I have added a link to my article so other people can click through more easily. Thanks again for sharing your knowledge.
WWWOW !!! it came out BHeautiful!!! I cant belive i just saw it! i feal bad I did not see it before!!!! great great great job! thank you so much!