
Improved photographs – first stage
I am really proud of my latest jewellery and was thinking I must sort out the photographs show I can show you properly. Then today I was emailed some photographs by a friend to use on my blog (post coming soon), they are great photos and I just couldn’t put them up against my poorly lit ones so the ‘sorting out a photography set up’ jumped up the to do list!
 |
| Original, just on my work bench, owl photo |
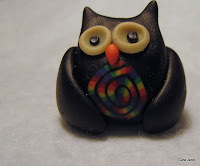 |
| Original photo cropped and colour adjusted in Picasa |
I wanted to make a light box from a cardboard box (as demonstrated on Kate Tracton’s Shibori Girl blog) but typically we don’t seem to have any boxes kicking around today. Whilst researching how to set up jewellery photo shoots previous I seem to remember someone using a transparent plastic storage container so thought I would give that a go whilst I find a box.
I switched my usual light bulb to a full spectrum daylight bulb and tried lighting from the top.
 |
| Plastic box and daylight bulb lit from the top through the box |
I thought it was quite good but my husband who is much more ‘precise’ than me pointed out that it was still dark at the bottom. So he adjusted the set up and…
 |
| Plastic box and daylight bulb light from the front photo – as shot! |

